Using Rathole to Host Web Services at Home
1173 words | 6 minute read
bringing it home #
last month i decided that i wanted to spin down the current digital ocean droplet i was using. it was starting to be a giant pain on the wallet for barely any resource usage cpu-wise and too little RAM (in my opinion, anyway. i’m just cheap). inspired by someone mentioning she hosts a website from her basement, my first thought was researching whether my ISP provided static IPs to regular non-business customers and the answer was a flat-out no. as disappointing as that was, i figured that i didn’t want to mess with opening ports on my router and taking care of all the baggage that comes with punching holes in a firewall that leads to my entire LAN anyway (i’m not a networking person, what can i say).
so i started looking at tunneling options.
eh? what’s “tunneling?”
well, good question! and something i didn’t have a clear grasp on at the beginning of this journey. essentially you’re creating a direct tunnel from the web app you want to host out to the wider internet, at least in my case that is.
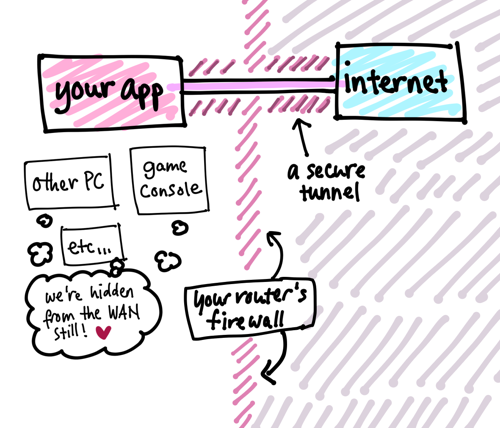
a secure tunnel provides an encrypted connection between your local machine and another machine, whether it’s a different local one or a far-away one, like a virtual private server you rent.
rathole #
i spent, i think, maybe a week or two looking at software that wasn’t ngrok or cloudflare-adjacent and after a lot of trial and error, i somehow stumbled upon rathole which gets my award for the best name ever because what other utility makes your terminal say this when you unzip the archive:

anyway before moving on here’s a disclaimer
so here’s what i did to prep for my move:
- got a new digital ocean droplet, one of the $4 ones, to act as the rathole server
- set up an old1 laptop with debian 12, the rathole client
- downloaded rathole from here on both the laptop and the VPS
- set up caddy on the VPS to use as a reverse proxy
once everything was in place, i began migrating my services one-by-one from my old droplet to the laptop at home. it thankfully wasn’t too hard since i was running a lot of services and apps in docker containers. then i began setting rathole up.
each client needs its own rathole config file which you use with the -c flag. i named mine ‘client.toml’ so starting rathole manually looks like this for me:
# /home/amelie/rathole-example
./rathole -c client.toml
client.toml should have entries for the client itself and the service you want to expose via the VPS.
# client.toml for rathole
[client]
remote_addr = "example.com:7000"
# hostname/IP address and port of your VPS.
# the port must be the same as the one declared in "server.bind.addr"
# because this is the port your machine at home will communicate to the
# VPS on.

[client.services.example]
token = "hack-me"
# Must be the same with the server to pass the validation
# oversimplified: this is how your rathole server and client prove to
# each other their identities. a secret handshake of sorts.

local_addr = "127.0.0.1:1234"
# The address of the service that needs to be forwarded
# ...
so essentially, your rathole server is going to listen on port 7000 for any changes to the rathole client. you need to let rathole know which services you’re running and what ports they’re listening on. for example, i have an iceshrimp instance listening on port 3000. i need to let my laptop’s firewall allow port 3000/tcp so iceshrimp is accessible on my LAN. if i go to 192.168.1.172:3000 on a regular computer or phone on the same network, iceshrimp loads. perfect!
okay, now i can set up the server side of things. i ssh’d into my $4 vps and set up a “server.toml” for it. it looks similar to this:
[server]
bind_addr = "0.0.0.0:7000"
# we making the server side of rathole listen on port 7000 for our
# rathole client. be aware that the example here will accept any
# client that requests a connection from its running rathole

[server.services.example]
token = "hack-me"
# Token that is used to authenticate the client for the service. Change to a arbitrary value.
# make sure both tokens in server.toml and client.toml match!

bind_addr = "0.0.0.0:6543"
# specifies the port that exposes "example" to the internet.
# in other words, when people to go ip-or-url-of-your-vps.com:6543, they'll
# be directed through the tunnel to 192.168.1.172:1234, or whatever the LAN address of the client is
i saved the config file and started up the server with ./rathole -s server.toml. i also set up caddy as my new webserver/reverse proxyer and spun down apache on my old vps. then, i switched to my laptop and started rathole as a client. both consoles’ input indicated the connection was successful. yes! this was an extraordinary relief as i couldn’t get a previous tunnel app to work. for like. three days. i wanted to yell so bad lol
all i had to do thereafter was point my browser to https://a.sapphic.online and my iceshrimp instance loads!
migrating the rest of my web apps like bin and my minecraft server to use rathole was a breeze. for minecraft all you need to do is open and use port 255652 on both rathole’s server and client (if using default mc server settings). for anything needing to be accessible by url, i just created reverse proxy directives as i needed them in my Caddyfile. now anyone on the internet can come visit all the apps i have running on my laptop without my residential IP being exposed. additionally, i don’t have to worry about my ISP’s dynamic IP assignments changing.
and that was it! it really was no muss no fuss. after all was confirmed working, i set up some systemd services to autostart rathole on both sides and bam, my digital ocean bill is going from $51 to $4 😇